

[register role=”instructor” message=”Congratulations! You have registered as an instructor on KilnArts.org. To login, go to: https://kilnarts.org/wp-login.php . Once logged in, you will be redirected to https://kilnarts.org/class-form/ where you can add and modify your classes. Simply click Add New and fill out the form fields. Please take the time to write down your username and password below.” notify=”info@kilnarts.org” password=”yes” fields=””]
Author Archives: kilnarts
Applying Glazes
More to come soon on Brushing
Brushing is the most popular way to apply glazes for hobbyists. There many different brush styles and brushing techniques that can interesting patterns and texture to your ceramic piece.
Spraying
Spraying is a more advanced technique that involves a little more investment in equipment. Spraying allows you to lightly layer glazes for interesting effects.
Dipping
Dipping is usually used in conjunction with clear over glazes but can also be used with other glazes as well. It obviously involves a lot of glaze since the pieces need to be submerged.
Pouring
Pouring is a technique normally used to glaze the inside of vessels. It can also be used to for interesting patterns on the outside of pieces.
Slip Trailing
Slip Trailing is a technique that involves placing colored slip (liquified clay) in a slip trailing bottle with a special tip that allows you to draw textured patterns on your piece.
Types of Glaze
More to come soon on:
- Colored Slips
- Underglaze
- Glaze
- Overglaze
- Lusters
What Exactly is Glaze?
Ceramic glaze is basically glass melted onto a ceramic object. Because glaze needs to adhere to an often-vertical surface while not running off the piece, its component parts are ground into powder and mixed with water and binders so that it can be applied to ceramic pieces. Typical application methods include brushing, dipping, pouring, trailing, and spraying.
Technically speaking, glaze is silica (glass), a flux (melter), and a refractory, for durability and to keep it from running off a vertical surface.
Glass Fusing 101
 What is Glass Fusing?
Glass fusing is simply the process of stacking two or more layers of “compatible” glass together to make a design, and then placing the stacked glass into a kiln, where it melts (fuses) together.
What is Glass “Compatibility?”
Glass expands when it is heated and contracts when it cools. All glass has a distinct rate at which it expands and contracts, generally referred to as the Coefficient of Expansion (C.O.E.). You cannot fuse glasses with differing C.O.E. rates together — breakage will result! This is why choosing a family of glass products should be the first step in fusing.

Most manufacturers of fusing glass test their own products consistently to assure compatibility within their own lines. The phrase “Tested Compatible” is often used to assure a specific family of products will correctly fuse together well.
“Firing” Glass — Fusing and Slumping
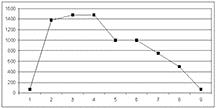
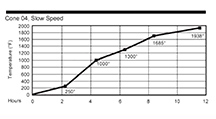
After cut, or nipped pieces of compatible glass are stacked/assembled, the project is placed in a kiln. The kiln will heat the glass slowly from room temperature up to fusing temperatures (1300º-1500º Fahrenheit) and slowly back down again according to the Firing Program or Schedule selected. Different effects — how smooth, or dimensional the finished surface of the fused piece will be — can be created through controlling the firing program.

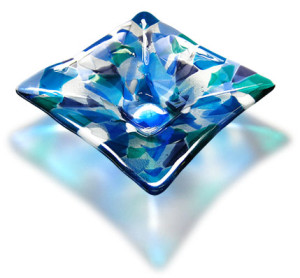
The finished fused piece can be displayed as a flat decorative piece that can be enjoyed as it is, or put back into the kiln and shaped into a 3-dimensional piece such as a bowl, vase, or other artistic shape through a second firing – this type of glass kiln-forming is called “slumping.” Glass is slumped at lower temperatures than fusing (1225º – 1250º F) and is shaped using kiln-washed molds of various types.
Getting Started
Once you have chosen which family of compatible glass products to use, it is best to consult the glass manufacturer for recommended firing schedules, and other information. There are also many classes available to help you learn about, and explore the numerous and exciting possibilities of kiln-fired glass. Look through the links on this site to learn more.
Click here for Starter Packs.
Loading
Loading your kiln properly is one of the keys to successful firings. A little planning ahead of time cane save you a world of headaches. Here are some of the things you want to consider before you load the kiln.
 Keep It Separated
Does everything in your kiln fire to the same temperature with the same program? Loading items in your kiln that fire to different temperatures can be disastrous. For example, an Earthenware clay will completely melt if fired to Stoneware temperatures. When firing ceramics you want to keep bisque firings and glaze firings separate and make sure that the glazes and clay bodies in each load are designed to fire to the same temperature using the same program.
This is also true with glass. Manufacturers recommend different firing programs for different COE glass. If you choose to work with a variety of glass, clay and glaze we recommend you store them on different shelves to keep from mixing them up.
 Watch Your Clearances
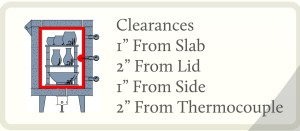
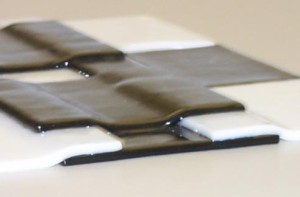
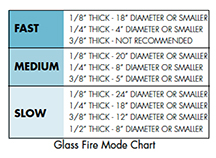
Clearances between pieces and from the kiln itself are important when loading your kiln. When loading pieces on a kiln shelf you want to be sure nothing is touching. When fusing multiple layers of glass you need to remember that when the glass melts it can extend beyond its original footprint. Just because a project isn’t touching when you load it doesn’t mean it wont touch when it is fired.
Items located too close to the elements can receive more heat then the rest of the load and items loaded too close to lids and slabs that do not have elements may be underfired. Also it is important to keep pieces and shelves at least 2” from the thermocouple to avoid biasing the reading.
 Load Evenly
The key to a nice even temperature from top to bottom is loading the mass in the kiln evenly. If you have a large kiln this can take some planning. The tendency is to load it really heavy on the bottom anticipating you wont have enough room or real heavy on top after you realize you are not going to have enough room. Both of these are bad.
One trick is to cut out pieces of cardboard the size of your shelves and place your ware on those as they are drying or are assembled. When you have filled the cardboard you know you have a full shelf of ware. It also helps to place pieces of equal height on the same piece of cardboard. This way you ensure the kiln will be loaded with a minimum amount of wasted space between shelves.
Manufacturer Links – Elements
Skutt Video
Preparation
Test Fire
After you have found a location for your kiln the next thing you are going to want to do is test fire it. Most kiln manufacturers will thoroughly test the functionality of the kiln before they ship it however your kiln may have travelled a long way over bumpy roads to get to you and sometimes damage can occur. A test firing is always a good idea before you fire pieces that you have worked long and hard on.
 The Benefits of the Test Fire
When you run your test firing you are not only making sure the kiln is operating correctly, you are also accomplishing several other important tasks.
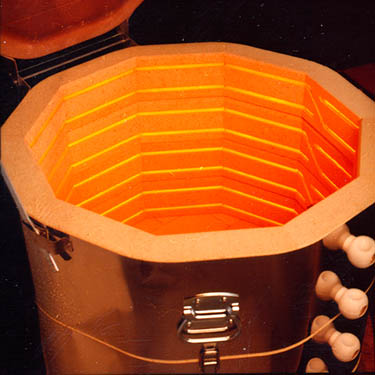
The first time you fire your elements you will burn off the oil used to protect them from corrosion. Your first firing will create an oxide coating which will take over this function for the life of the element. In order for this coating to form the kiln must reach a temperature of at least 1900 F, which is beyond the upper temperature rating for many glass kilns. For ceramic kilns it is recommended that you do a 04 firing (1945 F) to attain the maximum benefit.
Another benefit to the elements that occurs during the first firing is that they soften at high temperatures. This relieves the stress induced in them during the coiling process and allows them to sit down in their grooves, preventing them from wanting to crawl out.
Read Your Manual
Reading your manual from cover to cover may not be the most exciting thing you do that day but it can save you a lot of frustration down the road. At the very minimum you will need to learn how to program the kiln for the test firing.
 Test Fire Steps
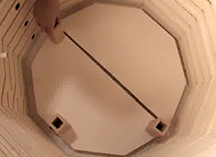
Post up shelves in the kiln high enough to reach the thermocouple. This will simulate the mass you would normally fire in your kiln and allow you to place a pyrometric cone 2” from the thermocouple. If you have a ceramic kiln you will want to use a Cone 04. If you have a glass or metal clay kiln that is not capable of reaching Cone 04 you may want to do two firings. One to the highest rating of the kiln to form the oxidation coating, and one to a process temperature with a sample of scrap material placed 2” from the thermocouple to see if the thermocouple is firing accurately.
Read your manual’s instructions for programming your kiln and press start. Monitor the kiln while it is firing to make sure it is climbing at the programmed rate and plan on being present when the kiln reaches maximum temperature to be sure it shuts off. If for some reason it does not shutoff when it is suppose to, turn off the breaker supplying the kiln and call your supplier or kiln manufacturer for instructions on how to proceed.
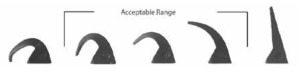
 After the kiln has cooled to room temperature, open the lid and inspect the cone or sample material. If you are using a cone the tip of the cone should have bent within the acceptable range shown in the diagram. If you are using sample material, inspect it to see if it was underfired or overfired.
If the results were not as expected, call your kiln supplier or manufacturer for instructions on how to proceed.
Protecting Your Shelves
Shelves are used to hold the ware you place in your kiln. They are supported by posts and can be utilized in multiple layers if you have a side-fired kiln. Ceramic Glasses and Glass become fluid at high temperatures and can stick to your shelves if they come in contact with them.
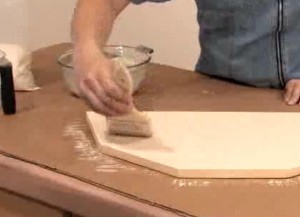 To protect them it is recommended to coat them with kiln wash. Kiln wash is made of a high temperature powder that is mixed with water to the consistency of cream and then painted onto the shelf. It is recommended to use a brush to paint on a thin layer, let it dry, and then paint on a second layer. You will want to make sure they are completely dry before you fire them in the kiln.
In addition to kiln wash you may want to use special stilts made for ceramics to hold ceramic pieces that are glazed off of the shelf.
With glass you may want to use a special high temperature fiber paper under your glass to limit the amount of times you need to recoat your shelves
Manufacturer Links – Elements
Skutt Video
http://www.skutt.com/video/1_a.location.html
Programming
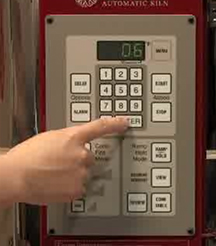 Programming your kiln can be a little intimidating at first but it doesn’t take long before it becomes second nature, like using your microwave. There are a lot of different controllers out there however most have similar functions.
We recommend you follow the programming instructions that came with your kiln. We are including links to the manufacturers websites at the end of this article but we thought it would be helpful to go over some of the basics.
We also recommend that you stick to factory programs whenever possible until you gain a full understanding of your kiln and your craft. As you will find, writing your own programs can get a little complicated.
How Does a Controller Work?
The job of a controller is to control the power of the kiln in such a way that it follows the firing program you have entered. It does this by reading the temperature in the kiln chamber with a thermocouple, which relays the temperature information to the controller. The controller than looks at the information in the program and decides whether it needs to send power to the elements or not.
If it decides it is necessary to send power to the elements, it sends a signal to the relays to close (connecting the power) and power is sent to the elements.
 What is a Firing Program?
Firing programs were developed because bad can happen to your art if you go too fast or too slow through certain temperature ranges. Most hobbyists use factory programs that address these issues. Sometimes you want to fire something that your controllers preset programs are not designed for and therefore you need to write your own programs. An example would be if you wanted to fuse glass in a kiln that is only equipped with factory programs for ceramics. Most controllers used by hobbyists have a programming mode called Ramp and Hold. This is where you would enter your program.
Factory Programs
As you will see in the discussion of Ramp and Hold programs that writing your own programs can be very involved. That is why most kiln manufactures have built in program options that were designed by firing specialists that basically write the programs for you. You just give the controller some basic information and it loads the correct program to run.
 ConeFire Mode
In ceramics, the factory programs are accessed through something called ConeFire Mode. ConeFire Mode can be found on most ceramic controllers offered through kiln manufacturers.
To load a ConeFire program you simply enter a preheat time, the cone value you want to fire to, and a hold time at peak temperature if desired.
The preheat is entered in hours and minutes (i.e. 01.45 would be 1 hour and 45 minutes). A preheat time is recommended if you are not sure if the piece is completely dry. If you place a ceramic piece, especially a large or thick piece, in the kiln that still has moisture in it and fire it too fast, the water left wants to escape as steam and can crack your piece. When you enter a preheat time the program brings up the temperature very slowly and holds it at the time you have entered below boiling point (usually around 180 F). When the preheat time expires, the kiln moves on to the next segment of the program.
The Cone Value you enter can be for a bisque (unglazed clay) firing or a glaze firing. Each clay and glaze has a cone value listed on the box or jar that the manufacture recommends firing to. All you need to do is enter that recommended cone value and press enter.
The firing speed is determined by whether you are doing a bisque fire or a glaze fire. Slow is recommended for bisque fires since there may still be moisture in the piece. Medium is recommended for glaze firings and Fast is only used for specialty items like decals.
 Finally, your hold time is generally used to balance out the temperature in the kiln to make sure all of the pieces receive the same amount of heat work. Usually a 5-minute hold is recommended to achieve this. You can also add a little more hold time if to increase the total amount of heat work if your cones were not bending enough.
Other Factory Programs
Manufacturers vary on how they present factory programs for glass and metal clay. They are however similar in the sense that they ask a few questions and then have the controller load the appropriate program so you do not have to write or enter it. Consult the manufacturers manual for programming information.
 Ramp and Hold Programs
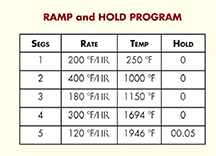
A program consists of one or more program segments strung together. Each segment has 3 pieces of information for the controller to perform; a rate, a temperature and a hold. When the kiln completes the instructions in the first segment it moves on to the next segments until the program is complete.
Rate
The rate, usually expressed in degrees per hour, controls the speed at which the kiln approaches the target temperature. This can be a cooling rate or a heating rate. It is important to remember that the kiln will only perform the best it can to achieve the programmed rate. For example, if you program the kiln to cool at 9999 F/hr it may only be able to cool at 500 F/hr due to heat storage (and because your kiln is not equipped with a refrigeration unit).
In most cases a slower rate is the safer way to go. Problems usually occur when you try to heat or cool too fast.
Temperature
The temperatures you enter can usually be expressed in Fahrenheit or Celsius. When the kiln reaches a temperature in a program it will either hold at that temperature or move instantly to the next segment using a different rate.
It is important to know a little about “heat work” when choosing temperatures in your program. Most of us are familiar with heat work through cooking. Good BBQ is slow cooked for 15 hours at 200 F, but you can attain the same amount of “doneness” by cooking it at 350 F for 2 hours. Heat work refers to the combined affects of time and temperature.
When you are writing your own programs it is important to consider not only the temperature but also the amount of time the kiln took to get to that temperature. The longer the time, the more heat work was achieved.
Hold Times
Hold times can serve several purposes in a program. The first is heat work, which we just discussed. The longer the hold time, the more heat work your pieces in the kiln will be exposed to.
Another useful aspect of hold times is to balance out temperatures in the kiln. Larger kilns have natural hot and cold spots within the kilns chamber. Hold times can help to balance out those differences. A hold time at the end of a firing can allow all the pieces to reach the proper heat work before the kiln begins to cool.
Finally, hold times can be used to balance out the heat within the pieces themselves. For example if you were firing a large glass platter, the rim of the platter which is closest to the elements, may get hotter then the center of the piece if you fire to fast. A hold time inserted in the program every no and then allows the temperatures between the rim and the center of the piece to balance out and prevent the piece from thermal shocking.
Manufacturer Links – Elements
Skutt Video
http://www.skutt.com/video/5_fm_a.firingmode.html
Locating
The first thing you need to do when you bring your kiln home is to decide where you are going to use it. Kilns are used safely in thousands of homes everyday but they do get hot so there are several consideration you need to make when deciding where you are going to use them.
 Manufacturer Recommendations
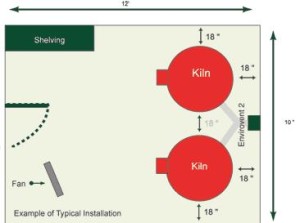
The outside temperature of a kiln can get up to 600 F therefore it is important to find a place away from combustibles and where access is limited by small children and pets. Most manufactures offer the following recommendations for locating your kiln:
- Locate your kiln near your present electrical outlet or where a new circuit can be installed. Position the kiln to the left of your electrical outlet so the cord will have an easy run and will not place a strain on the plug or outlet.
- Install it in a well-ventilated sheltered area such as a carport, garage, utility or hobby room. Allow a MINIMUM 18 INCHES (46 cm) of space between your kiln and adjacent walls, other kilns, shelving, etc. When multiple kilns will be installed in the same room, make sure the control boxes on the kilns are not facing adjacent kilns. Radiant heat from nearby kilns can damage the controller.
- For small rooms, monitor the firing so room temperatures does not exceed 105°F (41°C).
- Locate the kiln in a room with a bare cement floor. If a bare cement floor is not available, the uniform mechanical code requires two inches of masonry below the kiln extending a minimum of 12” (31 cm) beyond the outside circumference of the kiln.
- When installing a kiln in a room with a sprinkler system, do not place kilns within a 10 ft. (3m) radius below sprinkler heads
- All kilns are vulnerable to the highly corrosive effects of marine air. If you live near salt water, locate the kiln indoors and protect it from the damp air.
Manufacturer Links – Elements
Skutt Video
Power
 Many homes have a limited amount of power available to them. Adding more can be expensive and ordering the wrong kiln for your power supply can be a nightmare. All kiln manufactures will list the power requirements by model for all of their kilns. Here are the main factors to consider when choosing the power specifications for your kiln.
Voltage
Voltage refers to the type of electrical supply you have in your home. Most home have 2 different voltages available. 120 Volt supply refers to the standard outlets in your home. These are the one you plug your television and hair dryer into. This supply is convenient but it may not be enough to run the size kiln you want to the temperature you need. This supply will generally power the size kiln that would fit on a counter.
240v will allow for higher amperages which in turn will allow for larger kilns that can fire hotter than 120v kilns. This is what an electric range or clothes dryer would run on. If you are going to want a big kiln you are going to want 240 Volt supply. It is most likely that this is not readily available in your home. You will probably need to get an electrician to come in to wire the proper breaker, supply wire, and outlet for your new kiln. This is done all the time so it should not discourage you, just make sure you budget for it. Often times you can get a ballpark estimate right over the phone.
 In commercial settings you may want to have your voltage tested since 208 Volt supply is quite common. It is rare to find this voltage supply in your home.
Amperage
Amperage refers to the amount of electrical supply you have available in your home. Most newer homes have about 200 Amps available to them. Some older homes only have 100 Amps. If you know the Amperage available to your home, go look in your breaker box and add the amperage of all of your breakers. The total amperage available minus the total amperage of your existing breakers will give you a rough idea of how much amperage you have available for your new kiln. To be exact you would need to add the amp draw of every light bulb and appliance you would run while your kiln is running. Usually this is over kill but if you are concerned ask you electrician.
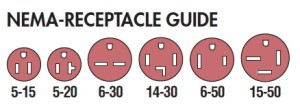 Phase
Phase
Phase is one of those subjects we hate to bring up because it can be a little confusing. The only reason we bring it up is that it is one of the bits of information your salesperson is going to ask you when you order your kiln. Basically all you need to know if it is going in your house is that 99.9% of the time, you have a single phase power supply (1 PH). Commercial buildings often have 3 phase power supply (3 PH) available but it is very rare to find it in your home. A 3 PH plug will have 4 prongs, 3 phase wires (current carrying) and a ground. A 1 PH plug will have 3 prongs (2 phase wires and a ground). A 120V will have 3 prongs as well but one of the phase wires is replaced with a neutral wire which converts the 240V supply to 120V.