Author Archives: kilnarts

Elements

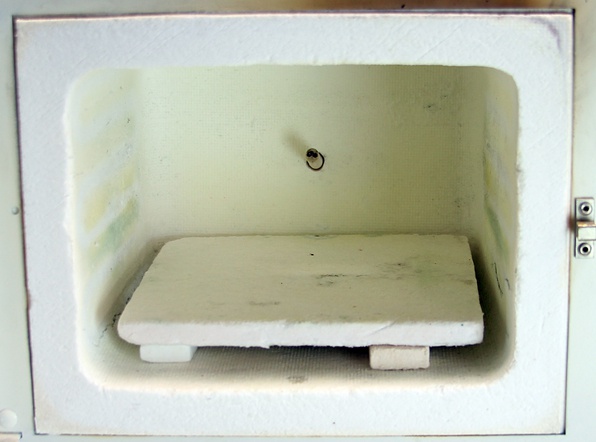
The elements are the metal coils in your kiln chamber that radiate the heat. They work just like the thin wire elements in your toaster but are a lot more powerful.

As they age they slowly lose their ability to radiate heat into the kiln. You may notice that your firings take longer and longer. Eventually, if you do not replace them, the controller will display an error message that tells you the elements can no longer achieve the firing rate and will shut the kiln down. If you have a manually operated kiln, the elements will eventually completely fail.

It is not uncommon for elements to last 100’s of firings. It all depends on the programs you run and well you take care of your elements. So how do you take care of your elements?

Vacuum the Element Grooves

When dust and debris settle on the elements they can eat away them, drastically shortening their potential life. Vacuuming your elements on a regular basis can sometimes more then double their life.

Use a Shop-Vac, or a strong home vacuum cleaner, and run it across the element grooves in your kiln chamber. Be careful not to touch the thermocouple with any part of the vacuum hose. The particles flowing through the hose create static which could be transferred through the thermocouple and damage the controller.

If you notice any pieces of glaze or glass in contact with the element be sure to get them out because they can instantly burn out an element. Try to do this once a month and you will be glad you did.

Do Not Burn Combustible Material

Clay and glaze have a certain amount of combustible material that burns out of them but most commercial materials available will not cause too much damage to your kiln if you follow your manufacturers recommendations for venting.

The biggest culprit is usually the wadded paper people forget to remove when they are building a hollow clay sculptures. Just be cognizant that if it creates smoke, it is not good for your elements.

Venting

Even if you are not burning combustibles, it is  still a good idea to follow your manufacturers instruction for venting the kiln. This is not only to make your elements last longer, it also can make your ware turn out better.

Avoid High Temperatures If Possible

There are certain clay bodies, glazes and techniques that require you to fire your kiln to high temperatures and sometimes hold at high temperatures to create interesting glaze effects. We would never want to discourage you from working with these materials or techniques, you just have to be aware that your elements are not going to last a long time. A lot of times it is really worth it.

Manufacturer Links – Elements

Skutt

Printed

http://www.skutt.com/pdf/service_manual/10-1_elements.pdf

Video

http://www.skutt.com/video/6_c.elements.html

Ceramic Starter Packs

For ceramic starter packs, please call AMACO at 1-800-374-1600.

Clay, Tiles, Tools & Glazes

Clay, Tiles, Tools & Glazes

Item # Description List
39239V Teachers Palette Class Pack #1 $41.50
46303C Natural Clay $8.95
11334M (8) 4.25″ x 4.25″ Bisque Tiles $15.92
11333L (8) 6″ x 6″ Bisque Tiles $23.92
11239J Sponge $1.45
11017N Wire Cutter $2.89
16007H 2.5″ Texture Roller Class Pack $19.00
32348L Canvas Board 10″ x 10″ $10.95
11146T Ceramic Brush Kit $25.95
Total $150.53

Clay, Tools & Glazes

Clay, Tools & Glazes

Item # Description List
39239V Teachers Palette Class Pack #1 $41.50
46303C Natural Clay $8.95
46301A Terra Cotta Clay #10 $8.95
11035M Pottery Tool Kit $15.49
32251G Sprig Mold Frog & Turtle $19.95
16007H 2.5″ Texture Roller Class Pack $19.00
32348L Canvas Board 10″ x 10″ $10.95
11146T Ceramic Brush Kit $25.95
Total $150.74

Get Started!

Rings by Lora Hart. Fine silver with gold accents, beads, and felt.

Rings by Lora Hart. Fine silver with gold accents, beads, and felt.

There are many wonderful resources for exploring the possibilities of metal clay. Books, e-books, classes, workshops, college classes, webinars, blogs, you name it! The websites of many manufacturers and re-sellers offer large selections of tips and sample projects.

For the best experience, start with a class. Nothing beats having the know-how of a talented teacher to start you on you metal clay journey.

"New Beginnings #006" earrings by Gale Schlagel. Fine silver.

“New Beginnings #006” earrings by Gale Schlagel. Fine silver.

Most teachers will start students off with silver clays. While more expensive than base metal clays, silver clays have the simplest firing schedules with the most consistent results. When wet, silver clays also behave more like ceramic and other art clays, making them a good choice for a first project.

Whichever clay begins your metal clay journey, you’ll no doubt fall in love with this incredible medium.

Firing

Firing Metal Clay 1

“Sun Garden Sanctuary” by Gordon K. Uyehara. Fine silver, sterling silver, and citrine.

There are many varieties of metal clay and firing methods vary from brand to brand. But there are some general rules of thumb when it comes to firing any metal clay.

Torch Firing

Most metal clays can be torch fired in very small amounts. Torch firing can be a useful method for someone starting out in metal clay who isn’t ready to invest in a kiln. But the more consistent and extended temperatures possible with a kiln firing are preferable.

Locket "Treasured" by Jeannette Froese LeBlanc. Fine silver and sterling silver.

Locket “Treasured” by Jeannette Froese LeBlanc. Fine silver and sterling silver.

Kiln Firing

Metal clays can be fired in a wide range of kilns, both top and front loading. Many metal clay artists prefer front loading kilns because they allow easier access to the kiln while it is still warm. However, kilns come in a huge range of sizes and shapes and metal clays will work in virtually all small kilns.

Firing Fine Silver and Gold Clays

Fine silver and gold clays are fired on an open shelf. Manufacturer’s recommendations vary, but most can be fired at 1650 F (900 C) for two hours or less.

Firing Base Metal Clays in Carbon.

Firing Base Metal Clays in Carbon.

Firing Base Metal

In order to prevent oxidation that can be very difficult or impossible to remove, silver alloy clays (sterling) and base metal clays (bronzes, copper, and steels) are fired in a vessel filled with activated carbon. Firing methods preferred by various manufacturers and artists differ quite a bit when it comes to base metal clays. Many involve a two-step process in which the organic binders are burned away with a torch or in a kiln before the piece is placed in carbon. Others require a single stage firing with the piece buried during the entire firing process. As with precious metal clays, a small programmable kiln that will hold temperatures for 1-2 hours will fire most any kind or combination of base metal clays.

Firing Metal Clay 4

“Blue Green Dream” by Pam East. Fine silver and enamel.

Finishing Metal Clay

After firing, silver clays have a white appearance, which polishes to a matte finish when brushed with a wire brush and a high shine with tumbling . This finish is beautiful without embellishment. But for many metal clay artists, creating the fired piece is only part of the process. Patinas, inks, and stains can be applied to enhance the surface of metal clays. Metal clay is also used in combination with enamels, resins, and other materials to great effect.

Even though they are fired in carbon, base metal clays tend to come out of the kiln looking dark and a little rough. Polishing with a rotary tool, such as a Dremel tool, is recommended for base metals. From time to time, base metal clays may also emerge from the kiln with small cracks. These cracks may be repaired by filling with metal clay paste and re-firing.

Tools

Metal Clay Tools 1While experienced metal clay artists have developed a wide variety of tools for working with metal clays, a new artist can get started in metal clay with a relatively small set of tools.


Arranging wet base metal clays.

Arranging wet base metal clays.

The Basics

  • A non-stick work surface, such as a non-stick work sheet like Teflon.
  • Rolling tools and spacers to measure depth (playing cards work just fine).
  • Textures (commercially made or found).
  • Balms or oils to keep clay from sticking to textures, tools, and hands.
  • Tools for cutting, carving, and manipulating wet clay.
  • Basic templates and molds of your choosing.
  • Sand paper and tools for sanding and refining dry clay.
  • A butane torch and firing pad.
  • Access to a kiln.
  • Tools for polishing, burnishing, and finishing fired clays, such as a wire brush and polishing cloths.
  • Air-tight storage container for unused clay.

These tools do not have to be expensive to work well. As with many clays, items that you have around your house or studio can often be re-purposed to make great metal clay tools.

Pendant by Nellann Roberts. Copper and bronze.

Pendant by Nellann Roberts. Copper and bronze.

More Advanced

As you continue your metal clay journey, you may want to invest in:

  • Patinas, inks, stains, and other finishes to alter the surface of fired metal clays.
  • A tumbler to create high shine.
  • Tools for making custom textures and molds.
  • Specialized items for making rings and hollow forms.
  • Rotary tools for advanced polishing and finishing techniques.
  • Torches and metalsmithing tools for creating custom findings and chains.
  • Resins, enamels, and other media that combine well with metal clay.


Ring by Ruth Greening. Fine silver and cubic zirconia.

Ring by Ruth Greening. Fine silver and cubic zirconia.

Metal clay can take you in many directions and your creative choices will dictate the contents of your toolbox. If you have ever worked with other art clays, such as polymer or ceramics, you may find that you already have many of the tools you need to work with metal clay. Basic sanding tools, such as sand paper and nail files are also used in many crafts and are important parts of your first metal clay kit.

A Look At the Process

This overview is by no means comprehensive, but below are the basic steps for creating with metal clay.

Before You Open Your Clay

It is important to spend some time thinking about your design. Make a few drawings and play with ideas. Then assemble all of the tools and supplies you will need.

The Steps

Overview 1

Rolling the clay to an even thickness. Use a small clay roller, a non-stick work surface, and playing cards as a thickness guide.

Overview 2

Cutting the clay. Templates and molds come in handy here.

Overview 3

Drying. Using a coffee warmer or fruit dehydrator speeds the process. Pieces can be easier to join or carve when they are dry.

Note: Do not use the same dehydrator for both metal clay and food use.

Overview 4

Adding texture. This is where metal clay really shines. Add texture with finger prints, rubber stamps, sea shells…the possibilities are endless!

Overview 5

Joining pieces of clay. Metal clay pieces can be joined while the clay is moist with a paste/slip. Bone dry pieces can also be joined with paste/slip or simply with water.

Overview 6

Sanding and refining dry clay. Artists choose to use metal files, sandpapers, and even nail files to smooth and shape pieces before firing.

Overview 7

Firing. Shown is the setup for firing silver clay on a kiln shelf. Base metals are fired in vessels filled with carbon.

While the kiln shown is a front-loading kiln, virtually any kind of small kiln will work.

Overview 8

Silver clay just out of the kiln has a white appearance.

Overview 9

Finishing after firing. Brushing clay with a wire brush will produce a matte finish. Doing this under running water with a little soap helps prevent scratching.

Other metal clays will also have a dull appearance after firing. With some burnishing, the metals will shine!

Overview 10

Matte finish after being brushed with a wire brush. From here, pieces can be considered finished. Or they may be tumbled, polished or burnished to a high shine. Artists may also apply chemicals to the surface of the silver, such as patinas, to alter its appearance.

Overview 11

Patina, if desired. Application of a liver of sulfur solution to create contrast.

Overview 12

Bring out the shine. Polishing and burnishing high spots increases the contrast with the patina.

Overview 13

Finishing off with findings, chains, beads, etc.

Overview 14

The finished product!

Forms of Metal Clay

Forms of Metal Clay 1Metal clays are available in a number of forms, from lump clays, to powders, to syringes and sheets of pliable clay.

Powders

Fine silver pendant by Teva Chaffin with fine texture.

Fine silver pendant by Teva Chaffin with fine texture.

Many metal clays come in powder form. Before use, they are mixed with distilled water and kneaded to the desired consistency. These powder varieties have the advantage of having a virtually indefinite shelf life, since they never dry out.

Lump Clays

The majority of metal clay comes in the form of lump clay. These clays are moist and sold in sealed packages. Clay can be taken out of the sealed package and used immediately without any mixing. Most frequently, lump clay is rolled flat and textured, before being cut, draped, stacked, domed, molded, carved, and sculpted into its final form.

Sheet or Paper Clays

Silver metal clays are available in a sheet or “paper” form of clay. This clays feels a little like a thin piece of rubber and has the advantage of never drying out. This type of clay is perfect for origami and other folded designs. It can also be cut, punched out, woven, and layered to create a variety of forms and textures.

“Ohm” pendant by Kris Kramer. Fine silver. Syringe drawing (left) and carving (right).

“Ohm” pendant by Kris Kramer. Fine silver. Syringe drawing (left) and carving (right).

Syringe Clays

Many metal clays come loaded in a syringe, which extrudes thin lines of clay perfect for drawing, making bezels to hold small stones, and repairing cracks in fired pieces. Syringe clay has more water in it than the lump clays, allowing for precise control and creation of delicate patterns.

Slip/Paste

Metal clays are also sold in a slip or “paste” form. Slip has the highest water content of all the forms, making it the thinnest in consistency. Slip can be used to join wet metal clay pieces together, to join fired metal clay (when combined with lavender oil), to create texture by layering with a paint brush, and to repair small cracks or breaks.

Many artists also paint organic items such as leaves and seed pods with several thin layers of paste to recreate them in metal. When fired, the organic material burns away leaving a cast of the original.

Some gold alloys also come in a slip form, which can be painted on fired silver clays and other metals.

"City of Rings" by Hadar Jacobson. Fine silver and assorted stones.

“City of Rings” by Hadar Jacobson. Fine silver and assorted stones.

Storage and Recycling

Care should always be taken to keep moist metal clay sealed in an airtight container after use. If it dries up, however, metal clay can always be reconstituted by grinding the dry clay into a powder and mixing with distilled water.

With care, you never have to waste any of it!

What Is Metal Clay?

Corliss Calavera by Lorena Angulo. Fine silver, copper and bronze.

“Corliss Calavera” by Lorena Angulo. Fine silver, copper and bronze.

Literally speaking, metal clay is just what it sounds like. It is clay – a combination of tiny particles of metal, organic binder, and water. Before firing, metal clays are soft and can be manipulated like any other clay. The amazing part is what metal clays become when they are fired – solid metal.

Available in precious metals (silver, silver alloys, and gold) and base metals (several varieties of copper, bronze, and steel), metal clays are used in a variety of art forms, most commonly jewelry. Metal clays were developed in the early 1990’s and were initially available only in fine silver and gold. Since then, the world of metal clay has blossomed to include a tremendous variety of techniques, styles, and clays.

The secret to metal clay is a process called “sintering.” When metal clay is fired, the water and organic binders in the clay burn away. The remaining metal particles are heated to a temperature below the melting point and they fuse together, creating one solid piece.

Locket by Hadar Jacobson. Steel, copper, and bronze.

Locket by Hadar Jacobson. Steel, copper, and bronze.

Two properties of metal clay make it the perfect art medium for those who like to try new things. First, metal clay has a unique ability to hold fine textures – even textures as tiny and subtle as fingerprints. The opportunities to explore with textures found in everyday life are endless. Second, most people have had some experience manipulating wet clay of some sort.

"Jewelry That Rocks" by Holly Gage. Fine silver and recycled CD’s.

“Jewelry That Rocks” by Holly Gage. Fine silver and recycled CD’s.

Add the relatively low cost of getting started in metal clay and you have the perfect medium for making beautiful jewelry and art pieces in any home or studio. Metal clay doesn’t require the physical strength, expensive tools, or large workspaces that traditional metal working involves. As an added bonus, most metal clays contain recycled metals.

Fine silver earrings by Lora Hart.

Fine silver earrings by Lora Hart.

Metal clays can be used alone or in combination with other materials to create everything from simple jewelry to complex decorative pieces that utilize movement. Artists often set precious stones in metal clay, and frequently combine it with polymer clays, enamels, glass, ceramics, found objects, textiles, wire-working, beading, and faux bone – even materials as diverse as cement and recycled CD’s.