More to come soon on:
- Bisque
- Glaze
- Lustre
- Raku
- Oxidation vs Reduction

More to come soon on:
More to come soon on:
While applying glaze to a ceramic piece it not absolutely necessary, it can enhance the fired clay piece both on an aesthetic and functional level.
Many clay bodies are not vitreous without being glazed. Glazes, by their nature, are vitreous. When glaze is fired onto a piece it is like covering the piece with glass. It seals the piece making it stain resistant and, depending on the glaze, food safe.
Glazes come in literally thousands of combinations of colors, textures, styles and types that can be applied in many different ways and fired at a range of temperatures. Glazes are sometimes the most exciting part of ceramics. This is partly because the transformation of the piece when it is fired can be quite pronounced. This is why it is often described as “the magic” in ceramics.
Most raw glazes do not look like what they will look like after they are fired. The heat of the kiln causes a chemical reaction in the glazes that alters their appearance. In glass they call this striking. If you have ever seen copper roofs turn green, the process is similar. The same glaze can also turn different colors when fired to different temperatures. Some glazes that can be fired to a wide range of temperatures will have one appearance at Cone 06 and a completely different look at cone 6. Have fun and explore the possibilities.
The description of a glaze surface properties falls into many names and categories with an infinite number of variables in-between. Here are the basic names you should learn to recognize. Transparent, Opaque, Gloss, Matte, Breaking, Flowing, and then there are the limitless color names added to these descriptive surface names. So a very descriptive name of a glaze could be Glossy Opaque Canary Yellow cone 05. The cone describing it’s firing range.
Transparent is a description of whether you can see trough the glaze to the clay body underneath. All clear transparent glazes darken the color or the clay or underglaze they are placed upon. Colored transparent glazes will darken the clay body and will often darken and muddy the color of an underglaze that is placed underneath them.
Opaque describes a glaze that cannot be seen through, thus covering the surface and color of the clay.
Glossy refers to a glaze surface that is shiny and reflects light.
Matte describes a surface that has no shine and absorbs light with no reflection.
So now we come to all the variables and combination names.
Semi Transparent is a glaze that has partial transparency just as Semi opaque means it will not completely block out what is beneath it.
Semi- Gloss means the glaze is somewhat shiny but not total reflective just as semi matte refers to the surface being somewhat dull but has a bit of shine. Then there are similar names such as Satin Matte.
The example Glossy Opaque Canary Yellow would describe a bright yellow shiny glaze that you cannot see through that a is recommended to be fired to cones 05.
Here are some further descriptions on how glazes react and move when fired.
A Breaking glaze is a reference to a glaze that will change color and sometimes transparency as it thins or thickens on a raised or recessed area during the firing.
A Flowing glazes means that it moves when fired and will bleed ( move ) into a glaze place next to it. A Stiff glaze stays put and does not move much from where it is applied when fired.Read the glaze label. It will tell give you information on the glazes concerning recommended firing temperature and application, and whether the glaze is non-toxic or cautions about its contents. Remember the non toxic and caution information refers to the contents of the glaze jar in it’s present liquid or dry form and is not an indication if the glaze is dinner ware safe. That should be listed separately on the jar.
Every manufacture of glazes creates their own codes and descriptions of their glazes that can mirror the names we have discussed or be different to set them apart from other manufacturers. Glazes can be categorized by their firing temperature, surface qualities, names and numbers. Don’t forget many will also have upc Bar codes and production dates so they can be tracked in sales and re-ordering. You should always run a test on glazes you have not used previously.
Before beginning to work with clay, it helps to have a basic understanding of its properties, the types of clay available, and the basic techniques of forming it.
The tabs above will lay the groundwork for your long and enjoyable attachment to this great hobby.
In this section we will explore every aspect of clay from where it is found to how it is fired. Once you have a understanding of the basics, go down to your local clay supply, buy a bag and start experimenting. The possibilities are limitless and the greatest discoveries are the ones that happen in your own studio.
There are many books and videos available that can help you on your journey of discovery however the fastest path to advancement is through hands on education. Search our database of classes and sign up for a clay class in your area today.
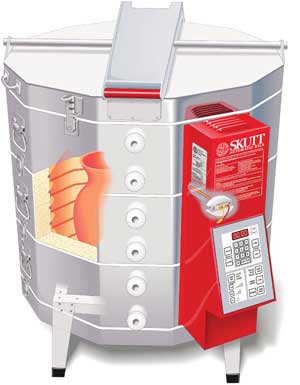 Understanding how yow kiln is constructed can be very helpful in troubleshooting problems and maintaining it properly. There are many types of kilns however for the purpose of this site we are only going to discuss the most common kilns used in the home; top loading electric kilns with automatic controllers.
Kiln brick is made of refractory (high temperature) ceramic material that is designed to withstand temperatures up to 2350 F. It is formed by mixing the crushed material with wood pulp and then firing it to burn out the pulp, leaving tiny pockets of air. This makes the brick very light and, because air is the best insulator, able to contain the heat in the kiln. It is then precisely machined for the various shapes needed.
The lid and bottom of the kiln are constructed by using a high temperature mortar to attach the brick together and then cut to shape. The sidewalls are generally not mortared, but held together by compressing them with a stainless steel band. The bricks used in the construction have grooves machined into them to hold the elements. Top-fired glass kilns have these grooves cut into the lid and the elements are pinned in place.
The bands that hold the brick together are generally made of stainless steel so they will resist corrosion. They are attached around the brick with worm screws so they can be tightened periodically to keep the brick from getting loose and shifting. It is important to keep the bands clean and dry. Even though they are made of stainless steel they will corrode if exposed to moisture and corrosive materials like salt and sulfur.
Peep plugs were originally developed to plug the holes in the kiln that were used to “peep” into the kiln. A pyrometric cone was placed on one or more shelves in the kiln while it was firing. The kiln owner would pull the plug out when they thought the kiln was nearing the end of the firing and look to see if the cone had bent. When the cone bent to the right position, it signaled that the ware had received the proper amount of heatwork and the operator would manually shut down the kiln.
Now that kilns have automatic controllers the peep plugs are used mostly to vent the kiln. They are pulled out to let fumes escape or to allow the kiln to cool faster.
Hardware is everything attached to the bands of your kiln except the controller. This includes the hinge, lid brace, handles, latches, and lid lifters. Most of these components are made of corrosion resistant metal or ceramic. It is extremely important to make sure these items are tightened occasionally. The lid brace is especially important on larger kilns because it supports the lid above your head while loading the kiln.
The thermocouple is the temperature-sensing device that extends into the kiln chamber and tells the controller what the temperature is so it knows when to turn on and off power to the kiln. Most hobby kilns use “Type K” thermocouples. They are fairly inexpensive to replace and can last relatively long, however they will eventually need to be replaced. Thermocouples will start drifting to an over fire when they need to be replaced, meaning the kiln will fire hotter than it should. This is generally a gradual process so you should have plenty of warning before you damage any ware. They are very easy to replace so you should be able to do this without the help of a professional.
Finally to the brains of the kiln, the controller. Automatic controllers have been around in the hobby industry since the early 1990’s. They replaced KilnSitter controllers that were mechanical devices that utilized a pyrometric cone to shut off the kiln. Automatic controllers allow you to do things that you cannot do well with mechanical controls; accurately control firing rates and holds, hold at peak temperature and control the cooling rate.
The power comes into the control box through the power cord where it is distributed to the relays and the controller. Since the controller runs on low voltage the power to the controller must first pass through a transformer to change the voltage from 120V or 240 Volts to 24 volts.
The thermocouple is connected to the controller and tells it what the temperature is in the kiln chamber. The controller then takes this information to determine whether the relays should send power to the elements. Pyrometric cones are used to verify the accuracy of your thermocouple.
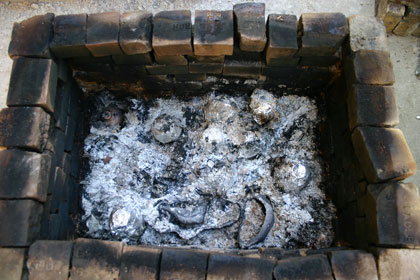 Kilns have taken many different forms over their long existence and continue to evolve. They have ranged from pits dug in the ground fired with dung to commercial kilns the size of football fields.
Relatively new in the long history of kilns, electric kilns have become the most popular kilns used by hobbyists and schools. This is primarily due to their ease of use, consistent results, low cost, and low emissions. There are many designs for wood and gas fired kilns used by advanced artists and industry. Since this site is focused on getting started we are going to discuss electric kilns only.
There are many shapes and sizes but the first characteristic most people use to distinguish them is their purpose.
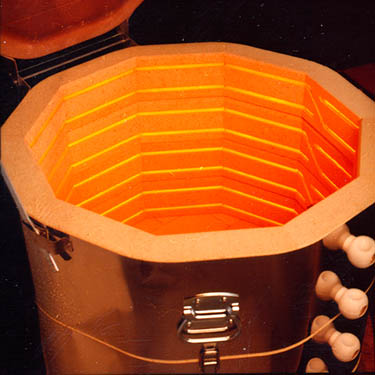 The most popular kilns used today by artists are powered by electricity and range in size from small units that can sit on your countertop to units the size of your refrigerator.
Ceramic kilns are generally defined by their temperature rating. The most common commercial ceramic glazes and clay are fired between 1828 F and 2345 F. The materials used in a ceramic kiln need to be carefully chosen and designed to not only reach those temperatures but also hold up to that harsh environment overtime.
Ceramic kilns will almost always only have elements in the side walls of the kiln. There are two reasons for this. When elements get over 1800 F they began to get soft like cooked spaghetti and therefore need to by supported by grooves cut into the brick of the side walls of the kiln. Another reason ceramic kilns are generally side firing is because artists generally fire multiple levels of ware in their kiln. The elements in the kiln can radiate between the shelves when mounted in the side.
The most common design is a cylindrical top loading shape. This shape is the most economical way to build a kiln so they tend to be less expensive then square front loading kilns (like a refrigerator).
There are many different types of glass kilns. Some are used by glass blowers to fully melt the glass so it can be blown into shapes others are strictly designed to anneal the glass. The most popular glass kilns found in the home are used to fuse a slump glass. Often times these kilns will have elements in the lid.
Unlike ceramic kilns, glass kilns are rarely fired over 1700 degrees so it is possible to pin the elements in the lid of the kiln so they can radiate evenly across the top of the piece being fused or slumped. Large glass pieces are sensitive to temperature variations within the piece while it is being heated and cooled so top firing helps to eliminate this variation. This does not mean you cannot successfully fire glass in side-heated kilns, you just need to fire a little slower.
There are many different shapes and sizes of glass kilns. Artists working with very large pieces may prefer a large oval or rectangular design whereas a glass jewelry maker prefers a small table top design. Some glass kilns are designed for easy access so the artists can manipulate the glass while it is hot.
Due to the expense of the material most metal clay projects are relatively small so the kilns used by these artist tend to be small table-top models. They can either be top or front-loading units and they are generally rated up to around 1800 F.
You can fire metal clay in any kiln that reaches the temperatures required however most people prefer not to use a large ceramic or glass kiln to fire a few small jewelry items.
Bronze and copper metal clay require you to use a small crucible kiln filled with material that burns to create a reduction atmosphere. It is important to use this crucible to contain the smoke that is created during the firing so the soot does not deposit on your elements and cause them to degrade. Make sure you choose a kiln large enough to hold the crucible you have chosen.
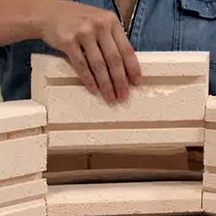 Your kiln can last a long time if you maintain it properly. We have organized this section into the 5 most common maintenance categories.
Every model will vary slightly so be sure to refer to the instructions provided by the manufacture of your model before you proceed with any maintenance. We have provided links to manufacture’s maintenance resources at the end of each section.
Remember to always unplug your kiln when you are working on it and if you are ever unsure about something, consult a professional. Most of these maintenance items can be done by the average person if they have the time and tools. If you are not a do it yourself type person consult the “Find Kiln Repair” section of this site for a Kiln repair professional near you.
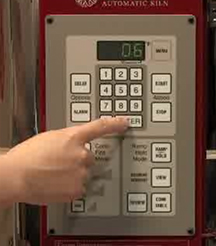 Operating your kiln is more than just pressing start on your controller. Everything from selecting a location to, to unloading the kiln is important to the safe and successful firing of your kiln.
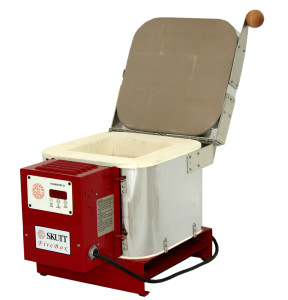
Kilns have been around for thousands of years and have taken many different forms. Ancient civilizations used them to create ceramic and glass vessels to store food and water. Later they were used to create metal tools and weapons but since the dawn of their existence they were used to create art.
Today kilns are found everywhere from industry to classrooms. Their main function is to create enough heat to temporarily or permanently change the physical structure of Clay, Glass and Metal.
Clay is permanantly transformed from being soft and plyable to hard and rigid.
Glass is temporarily heated to go from being hard and rigid to soft and pliable so it can be formed into shapes and then cooled back to a rigid form.
Metal can be heated in a kiln to make it harder or softer simply by the way it is cooled.
Whatever you use it for, the results seem magical. People who own kilns rarely lose that feeling of anticipation when they open the lid and see their pieces magically transformed.