

Test Fire
After you have found a location for your kiln the next thing you are going to want to do is test fire it. Most kiln manufacturers will thoroughly test the functionality of the kiln before they ship it however your kiln may have travelled a long way over bumpy roads to get to you and sometimes damage can occur. A test firing is always a good idea before you fire pieces that you have worked long and hard on.
 The Benefits of the Test Fire
When you run your test firing you are not only making sure the kiln is operating correctly, you are also accomplishing several other important tasks.
The first time you fire your elements you will burn off the oil used to protect them from corrosion. Your first firing will create an oxide coating which will take over this function for the life of the element. In order for this coating to form the kiln must reach a temperature of at least 1900 F, which is beyond the upper temperature rating for many glass kilns. For ceramic kilns it is recommended that you do a 04 firing (1945 F) to attain the maximum benefit.
Another benefit to the elements that occurs during the first firing is that they soften at high temperatures. This relieves the stress induced in them during the coiling process and allows them to sit down in their grooves, preventing them from wanting to crawl out.
Read Your Manual
Reading your manual from cover to cover may not be the most exciting thing you do that day but it can save you a lot of frustration down the road. At the very minimum you will need to learn how to program the kiln for the test firing.
 Test Fire Steps
Post up shelves in the kiln high enough to reach the thermocouple. This will simulate the mass you would normally fire in your kiln and allow you to place a pyrometric cone 2” from the thermocouple. If you have a ceramic kiln you will want to use a Cone 04. If you have a glass or metal clay kiln that is not capable of reaching Cone 04 you may want to do two firings. One to the highest rating of the kiln to form the oxidation coating, and one to a process temperature with a sample of scrap material placed 2” from the thermocouple to see if the thermocouple is firing accurately.
Read your manual’s instructions for programming your kiln and press start. Monitor the kiln while it is firing to make sure it is climbing at the programmed rate and plan on being present when the kiln reaches maximum temperature to be sure it shuts off. If for some reason it does not shutoff when it is suppose to, turn off the breaker supplying the kiln and call your supplier or kiln manufacturer for instructions on how to proceed.
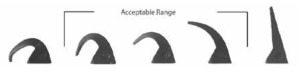
 After the kiln has cooled to room temperature, open the lid and inspect the cone or sample material. If you are using a cone the tip of the cone should have bent within the acceptable range shown in the diagram. If you are using sample material, inspect it to see if it was underfired or overfired.
If the results were not as expected, call your kiln supplier or manufacturer for instructions on how to proceed.
Protecting Your Shelves
Shelves are used to hold the ware you place in your kiln. They are supported by posts and can be utilized in multiple layers if you have a side-fired kiln. Ceramic Glasses and Glass become fluid at high temperatures and can stick to your shelves if they come in contact with them.
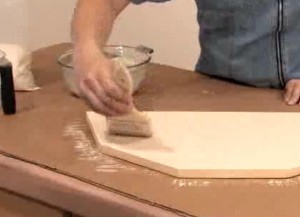 To protect them it is recommended to coat them with kiln wash. Kiln wash is made of a high temperature powder that is mixed with water to the consistency of cream and then painted onto the shelf. It is recommended to use a brush to paint on a thin layer, let it dry, and then paint on a second layer. You will want to make sure they are completely dry before you fire them in the kiln.
In addition to kiln wash you may want to use special stilts made for ceramics to hold ceramic pieces that are glazed off of the shelf.
With glass you may want to use a special high temperature fiber paper under your glass to limit the amount of times you need to recoat your shelves
Manufacturer Links – Elements
Skutt Video
http://www.skutt.com/video/1_a.location.html